Modern smartphones are powerful, compact, and complex devices. A small issue inside the hardware or software can silently affect performance, battery life, camera quality, or network stability. That is why running a full diagnostic test on a OnePlus phone is not just for technicians. It is useful for every user.
A diagnostic test helps you understand the real condition of your mobile phone. It checks whether key components like display, battery, sensors, speakers, microphone, and network modules are working as expected.
“A device rarely fails without warning. Diagnostics help you notice the signs before the problem grows.”
Whether you are facing problems, planning a repair, buying a used phone, or simply want peace of mind, this guide will walk you through all practical ways to test a OnePlus smartphone, from simple checks to technician-level methods.
This article is written differently from common Android diagnostic guides. It focuses on real usage, repair workflows, and quality control practices used by professionals.
What Is a Diagnostic Test on a Smartphone?
A diagnostic test is a structured process used to examine the health of a phone. It checks both hardware and software components to identify faults, weaknesses, or abnormal behavior.
On a OnePlus mobile phone, diagnostics may include:
- Display and touch accuracy
- Speaker and microphone output
- Battery condition and charging
- Camera modules
- Sensors like proximity and gyroscope
- Buttons and vibration motor
- Network, Wi-Fi, Bluetooth, and GPS
These tests can be run using:
- Hidden dialer codes
- Built-in system tools
- Manual inspection steps
- Diagnostic test online methods
- Pre-repair and post-repair inspection routines
When Should You Run a Full Diagnostic Test?
Running diagnostics is useful in many real-life situations:
- Before giving your phone for repair (Pre-Repair Diagnostic)
- After repair to confirm everything works (Post-Repair Diagnostic)
- Before buying or selling a used OnePlus phone
- When your phone heats up, lags, or drains battery fast
- If calls, camera, or network behave inconsistently
- As a routine mobile inspection test for long-term use
Technicians run diagnostics at multiple stages, not just when something breaks.
Method 1: Using the Official OnePlus Diagnostic Test Code (*#808#)
What Is the OnePlus Diagnostic Test Code?
OnePlus phones include a hidden factory diagnostic menu designed for internal testing and service centers. The most reliable diagnostic test code is:
*#808#
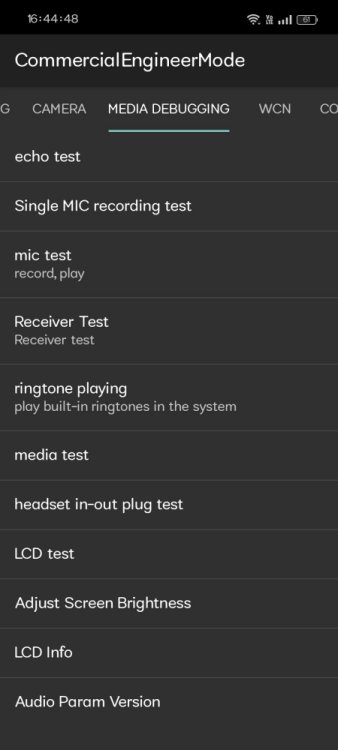
This code opens a detailed hardware testing interface on many OnePlus models.
How to Use the Code Safely
- Open the phone dialer
- Dial *#808#
- The diagnostic menu opens automatically
- Select tests one by one
Important: This menu does not delete data. It is safe if used only for testing.
What You Can Test Using *#808#
- Display colors, brightness, and dead pixels
- Touch screen accuracy
- Speaker and earpiece sound
- Microphone recording
- Vibration motor
- Proximity and motion sensors
- Camera modules
- Hardware buttons
- Charging response
This menu is often used as a quality check (QC) code in service workflows.
Related Diagnostic Testing Guides:
- Complete Xiaomi / Redmi smartphone testing guide
- Samsung Android Phone diagnostic test codes guide
- Vivo phone diagnostic disgnostic test methods explained
- Realme smartphone phone hardware diagnostic testing guide
- How to run diagnostic test on Oppo smartphones
Method 2: Built-In OnePlus System Diagnostics (No Code Needed)
Some OnePlus devices include internal diagnostic or health tools inside system settings. The naming may differ by model and OxygenOS version.
How to Access
- Go to Settings
- Open About Phone or Device Health
- Look for Diagnostics, Status, or System Check
These tools usually show:
- Battery health indicators
- Network status
- Storage condition
- Sensor activity
While not as detailed as the factory menu, this method is useful for everyday users.
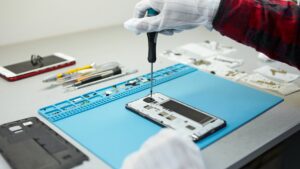
Method 3: Manual Mobile Inspection Test (Technician Approach)
Professional technicians never rely on a single tool. They perform a manual mobile inspection test alongside software diagnostics.
Display and Touch
- Check brightness uniformity
- Look for ghost touch or delayed response
- Test multi-touch with pinch and drag
Audio Components
- Play music at different volumes
- Test call speaker and loudspeaker
- Record voice and replay
Buttons and Ports
- Press power and volume keys repeatedly
- Test charging cable firmness
- Check headphone or USB port stability
Camera Check
- Open front and rear cameras
- Focus on text and distant objects
- Test video recording and flash
This hands-on inspection often reveals issues that automated tools miss.
Method 4: Diagnostic Tool Apps (Safe Third-Party Option)
A trusted diagnostic tool app can help when built-in options are limited.
What These Tools Usually Test
- Sensors (accelerometer, gyroscope, compass)
- CPU and memory load
- Battery usage patterns
- Network signal behavior
Use diagnostic apps only from reliable sources. Avoid apps that:
- Ask for unnecessary permissions
- Show unrealistic battery health percentages
These tools are best used as supporting checks, not final judgments.
Method 5: Diagnostic Test Online – What It Really Means
Many users search for diagnostic test online, expecting a web-based scan. In reality, online diagnostics work differently.
What Online Tests Can Do
- Browser-based touch tests
- Speaker and microphone checks
- Network speed and latency tests
- Camera preview tests
What They Cannot Do
- Access internal hardware sensors
- Check charging IC or battery chemistry
- Replace factory diagnostic tools
Online tests are useful for quick checks, especially when installing apps is not possible.
Pre-Repair Diagnostic: Why It Is Critical
Before any repair, technicians perform a pre-repair diagnostic.
Purpose
- Identify existing faults
- Avoid blame for pre-existing issues
- Decide repair feasibility
What Is Checked
- Power and boot condition
- Display and touch
- Network and call function
- Camera and audio
Skipping this step can cause confusion after repair.
Post-Repair Diagnostic: Confirming Repair Quality
After repair, a post-repair diagnostic ensures the phone is fully functional.
Key Checks
- Re-test replaced components
- Run *#808# again
- Perform a full mobile inspection test
- Verify charging and battery behavior
“A repair is complete only after the diagnostics say so.”
This step protects both technician and user.
Understanding Diagnostic Results (Simple Guide)
Pass Result
- Component works within normal range
- No abnormal behavior
Fail Result
- Hardware needs repair or replacement
- Further testing required
Inconsistent Result
- Could be software-related
- Restart and retest
Never panic over a single failed test. Confirm using another method.
Common Diagnostic Mistakes to Avoid
- Running tests on low battery
- Ignoring overheating warnings
- Testing speakers in noisy areas
- Assuming software bugs are hardware faults
Accurate diagnostics require calm and patience.
Technician-Level Keywords Used in Practice
This article reflects real repair terminology, including:
- Diagnostic tool
- Diagnostic test online
- Pre-Repair Diagnostic
- Post-Repair Diagnostic
- Mobile Inspection Test
- Quality Check (QC) code
- Factory hardware test
- Fault isolation process
These terms are commonly used in professional repair environments.
OnePlus Diagnostics vs Other Android Phones
While Android phones share similarities, OnePlus devices are known for:
- Cleaner diagnostic menus
- Faster hardware response during tests
- Fewer unnecessary restrictions
The *#808# menu is especially practical compared to many other Android brands.
Practical Tips From Real Usage
- Run diagnostics before updating software if issues exist
- Save screenshots of test results for reference
- Use both code-based and manual checks
- Avoid repeated stress tests on overheating devices
These habits improve long-term phone reliability.
Final Thoughts: Make Diagnostics a Habit
Running a full diagnostic test on a OnePlus phone is not complicated. With the right approach, even non-technical users can understand their device better.
Use:
- The *#808# diagnostic test code for deep checks
- Manual inspection for real-world behavior
- Online and app-based tools for quick validation
“A well-tested phone is a trusted phone.”
Make diagnostics part of your phone care routine. It saves time, money, and frustration.